Plane Mirrors - Complete Toolkit
Objectives
- To describe the law of reflection and to use the law to predict how light approaching a mirror at a given angle will reflect from the mirror surface.
- To explain the distinction between diffuse and specular reflection and to identify and describe several applications of each.
- To discuss what an image is and to explain how a plane mirror image is formed; and to describe the characteristics of a plane mirror image.
- To use ray diagrams to demonstrate how light travels from an object to the mirror to an observer's eye and to use such ray diagrams as tools in answering a variety of plane mirror-related questions.
- To analyze situations involving two mirrors in order to describe the observations that are unique to multiple-mirror arrangements (e.g., right angle mirrors, parallel mirrors, and adjustable angle mirrors).
Readings from The Physics Classroom Tutorial
- The Physics Classroom Tutorial, Reflection and the Ray Model of Light Chapter, Lesson 1
- The Physics Classroom Tutorial, Reflection and the Ray Model of Light Chapter, Lesson 2
Interactive Simulations
 Who Can See Who? Interactive
Have you ever wondered who can see who in a plane mirror and why. If Jill can view Jack's image in the mirror, can Jack view Jill's image? And if Casper can be seen by Mac in a plane mirror, then can Casper also be seen by Tosh who sits in a different seat? And what fundamental principle can be used to explain the answers to all these questions. Use the Who Can See Who? Interactive and find out the answers to these questions and more. The Interactive challengs students to identify what people can be viewed in a plane mirror from five different vantage points. Each student answer is evaluated and feedback is given. Opportunities for correction are offered and student progress is displayed on the main menu.
 Plane Mirror from eduMedia
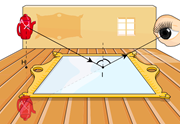
This interactive simulation depicts a teapot, a plane mirror, and an eye. A ray diagram is shown that illustrates how light gets from the object to the mirror to the eye. The teapot's image is also shown. The teapot can be dragged about the space; the image location and ray diagram update in real time. Complete access to the eduMedia resources requires a subscription; but this simulation can be used for a limited amount of time or with a trial version.
 Multiple Reflections in Plane Mirrors
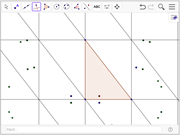
The topic of mirrors and lenses is often termed "Geometric Optics." The rules describing the reflection and refraction of light and the formation of images have a strong geometric nature associated with them. And there may be no better tool for studying the world of geometry than GeoGebra. This free-for-use online website allows a user to design their own interactive simulation or to use the simulations built by other members. A physics teacher can obtain a free account and have a collection of interactive HTML5 content instantly availble for use. Design your own activity or use one that has already been designed. You won't be sorry we suggested it. The one referenced here explores the multiple images formed by a set of three mirrors. The mirror angles can easily be adjusted and the image locations are updated in real time.
 Kaleidoscope
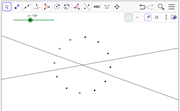
This free-for-use GeoGebra simulation allows a user to manipulate the angle between two mirrors and observe the multiple images formed by the mirrors. Easily adjust the angle or even the location of the object (marked in red). Primary, secondary, tertiary (and more) images are color-coded. Learners can adjust the angle to 90° and quickly view locations of three images. Move the object and view the images as they move. Decrease the angle and explore the effect of decreasing angle upon the number of images.
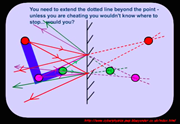
 Mirror Reflection
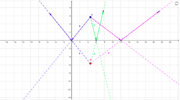
This last GeoGebra simulation will take a learner a long distance towards understanding the formation of images. The interactive simulation features a plane mirror, an object, and three sets of incident and reflected rays. Extensions lines are drawn for all three reflected rays showing their intersection at the image locatoin behind the plane mirror. The object can be moved; all light rays and extensions are updated in real-time. The angle of the incident and reflected rays can also be altered. This is a powerful manipulable for use as either a student exercise or teacher demonstration.
Video and Animations
 Reflection in a Plane Mirror
This nearly 4-minute YouTube video from Cyberphysics describes the lateral inversion of an image in a plane mirror. The video also does a great job explaining the details as to how to determine the image location for a complex-shaped object using a ray diagram.
 Ray Diagrams for Plane Mirrors
This 10-minute YouTube video from the Swanson Does Science channel provides a thorough discussion of the construction of ray diagrams for plane mirrors and the properties of the images that are formed. The lecturer does an excellent job of presenting the information and explaining the details. Graphics and diagrams are very imformative and make the concepts very understandable.
 Multimedia Physics Studios, Image Formation for Plane Mirrors
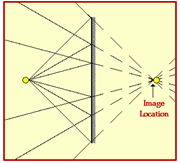
This simple GIF animation an accompanying text from The Physics Classroom clearly demonstrates why an image is formed by a plane mirror. Simple and to the point, it drives home the conception of an image as the location in space where it seems to its observers that all the reflected light is coming from.
Teaching Tips
 How to Teach Reflection of Light in the Classroom
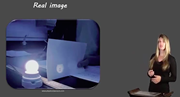
This 8-minute video from the Science Teaching Alive series describes a collection of labs, demonstrations, and tips for teaching students about the reflection of light and the formation of images. Produed by veteran physics teacher Brian Gay, the video would be an excellent resource for those who are teaching about reflection of light for the first time.
Photo Gallery
 Specular Reflection Photo Gallery
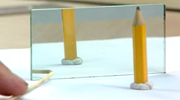
If you have not seen any of The Physics Classroom's photo galleries, then this would be a good time to start. This gallery of photos features photos from some of the best amateur photographers on the Flickr photo-sharing website. Each photo was carefully selected and annotated to tell a story about a concept. In this case, the story is about specular reflection. Breath-taking photos and simple, understandable explanations make the gallery a perfect tool for any level. It is the perfect blend of intersting art for educational purposes.
Labs and Investigations
Labwork is an essential component of any science course. There may be a temptation on the part of 21st century teachers to replace labwork with simulations, animations, PowerPoint presentations, and YouTube videos. While each of these have value, none can substitute for the value of a hands-on experience. The labs listed and described below offer a teacher a collectrion from which to pick and choose in order to provide their students with this essential laboratory experience. Most can be done very simply and quickly with minimum set up and minimum expenditures.
- The Physics Classroom, The Laboratory, Reflection Lab
Students use a plane mirror and a low-cost laser level set on line setting in order to discover the law of reflection.
- The Physics Classroom, The Laboratory, Plane Mirror Image Lab
Students use a plane mirror and a low-cost laser level to explore the reflection of light that emmanates from an object and then to use ray tracing to located the image location.
- The Physics Classroom, The Laboratory, Rough versus Smooth Lab
Students compare the reflection of laser light off a plane mirror surface to the reflection off a paper surface in order to discover the differences between specular and diffuse reflection.
- The Physics Classroom, The Laboratory, What Portion ... ? Lab
Students use a low-cost laser level and a mirror to explore the question of What portion of a mirror is required to view one's complete image?
- The Physics Classroom, The Laboratory, Right Angle Mirror Lab
Students apply the definition of an image in order to use reflected laser light off a perpendicular mirror system in order to determine the location of the secondary image formed by a right angle mirror.
- The Physics Classroom, The Laboratory, Improving your Image Lab
Students use a double-mirror system that is hinged (by duct tape) in order to explore the mathematical relationship that relates the number of images to the angle between the two mirrors.
- The Physics Classroom, The Laboratory, Infinity Derivation
Students develop a mathematical equation (or two) that relates the image distances of the various images produced to the right the right mirror of a parallel-mirror system. This is more of an exercise in thinking and mathematical reasoning than it is a hands on experience.
Source: The Laboratory at The Physics Classroom
Minds On Physics Internet Modules:
The Minds On Physics Internet Modules are a collection of interactive questioning modules that target a student’s conceptual understanding. Each question is accompanied by detailed help that addresses the various components of the question.
- Reflection and Mirrors, Ass’t RM1 - The Law of Reflection
- Reflection and Mirrors, Ass’t RM2 - Plane Mirror Images
- Reflection and Mirrors, Ass’t RM3 - Plane Mirror Ray Tracing
- Reflection and Mirrors, Ass’t RM4 - Diffuse vs. Specular Reflection
Concept Building Exercises:
- The Curriculum Corner, Reflection and Mirrors, Light Reflection
- The Curriculum Corner, Reflection and Mirrors, Specular vs. Diffuse Reflection
- The Curriculum Corner, Reflection and Mirrors, Image Formationi and Characteristics
- The Curriculum Corner, Reflection and Mirrors, Ray Diagrams
Problem-Solving Exercises:
- The Calculator Pad, Reflection and Mirrors, Problems #1 - #6
Link: The Calculator Pad
Common Misconception:
- The Image is on the Mirror Surface
You can poll your students on the first day of the unit, asking them where their image is located in the mirror; make it multiple choice with "On the surface of the mirror" and "Sometimes on the surface of the mirror, but not always on the surface of the mirror" being among the options. Predictably an overwhelming majority of novices to mirror concepts will select these as answers. The fact is that the image is located behind the mirror surface and as far behind it as the object is in front of it. While we may look at a specific location on the mirror surface to view an image of an object, the image itself is not located at the surface location. In discussing the image location quite early in this unit, be sure to point out the conception and provide multiple opportunities for students to reject it.
- Objects Located Beyond the End of the Mirror Cannot be Seen
This is a common misconception that students acquire, perhaps by their own observations of self in a bathroom mirror. They observe that they are unable to view their own self when they walk beyond the edge of the mirror. But such conclusions do not apply to all objects since when located to the right of the right edge of the mirror they can see objects located to the left of the left side of the mirror. The misconception can be easily dispelled using a classroom demonstration with one mirror and students as the objects. Ask who can see who and make a note of the fact that students located beyond the mirror can be seen by other students on the opposite side of the room and that students located directly in front of the mirror cannot be seen by all students. Follow this up with some ray diagramming (see the Concept Building Exercises). Then follow this up with the Who Can See Who? Interactive (see Interactive Simulations).
- Language! Language! Language!
While there's no actual misconception involved here, there is an appeal to all teachers to watch your language and to watch your students' language. Language is one of the primary media by which ideas are communicated ... and miscommunicated. And so as a teacher, it is always essential to give some advanced consideration as well continuous reflection upon the language that you use to describe and explain things. "You know what I mean" appeals do not erase the meaning that you just conveyed by poorly chosen words. In a discussion of plane mirrors, the problematics phrases and meanings that are often used and their suitable replacements are listed here:
- the object reflects off the mirror (as opposed to light reflects off the mirror)
- look at the image in the mirror (as opposed to view the image by looking at its location behind the mirror)
- the image on the mirror (as opposed to the image located behind the mirror)
- the object is reflected across the mirror (as opposed to the image is a geometric reflection of the object across the plane of the mirror)
- the image is reflected behind the mirror (as opposed to just about anything other than that ... like imaginary extensions of the reflected light are traced backwards behind the mirror to an intersection point.)
Standards:
A. Next Generation Science Standards (NGSS)
Crosscutting Concepts
Scale, Proportion and Quantity
- Algebraic thinking is used to examine scientific data and predict the effect of a change in one variable on another (e.g., the effect of the angle between the mirrors upon the number of images).
Patterns
- Mathematical representations are needed to identify some patterns.
Science and Engineering Practices
Practice #2: Developing and Using Models
- Develop and/or use a model (including mathematical and computational) to generate data to support explanations, predict phenomena, analyze systems, and/or solve problems.
Practice #3: Planning and Carrying Out Investigations
- Plan and conduct an investigation individually and collaboratively to produce data to serve as the basis for evidence, and in the design: decide on types, how much, and accuracy of data needed to produce reliable measurements and consider limitations on the precision of the data (e.g., number of trials, cost, risk, time), and refine the design accordingly.
Practice #4: Analyzing and Interpreting Data
- Analyze data using tools, technologies, and/or models (e.g. computational, mathematical) in order to make valid and reliable scientific claims.
Practice #5: Using Mathematics and Computational Thinking
- Use mathematical, computational, and/or algorithmic representations of phenomena or design solutions to describe and/or support claims and/or explanations.
Practice #6: Constructing Explanations
- Construct an explanation based on valid and reliable evidence obtained from a variety of sources (including students' own investigations, models, theories, simulations, peer review) and the assumption that theories and laws that describe the natural world operate today as they did in the past and will continue to do so in the future.
- Apply scientific reasoning to link evidence to the claims to assess the extent to which the reasoning and data support the explanation or conclusion.
Practice #7: Engaging in Argument from Evidence
- Make and defend a claim based on evidence about the natural world or the effectiveness of a design solution that reflects scientific knowledge and student-generated evidence.