Reflection and Mirrors Review
Navigate to:
Review Session Home - Topic Listing
Reflection and Mirrors - Home || Printable Version || Questions with Links
Answers to Questions: All || #1-#19 || #20-#26 || #27-#32 || #33-#42
Part B: Diagramming
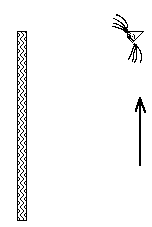
27. On the diagram below, sketch the path the light ray would take as it travels.

|
Answer and Explanation:
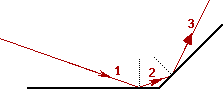
The path of the reflected ray at each boundary can be determined by sketching a normal at the point where the incident ray strikes the mirror surface. Once the normal is constructed the angle of incidence can be measured. For instance, the black dashed line at the location where ray 1 strikes the mirror is the normal line. The angle between ray 1 and the normal is approximately 62 degrees. The reflected ray should be drawn at the same angle from the normal - 62 degrees - but on the opposite side of the normal line. Ray 2 is thus drawn at a 62 degrees from the dashed normal line. Ray 2 is extended towards the second mirror. The process of measuring the angle of incidence and drawing the reflected ray (ray 3) is repeated.
|
[ #27 | #28 | #29 | #30 | #31 | #32 ]
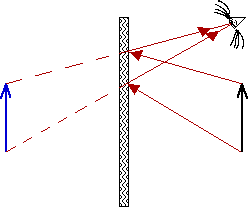
28. Locate the images of the objects below and state which images can be seen by the eye.
|
Answer and Explanation:
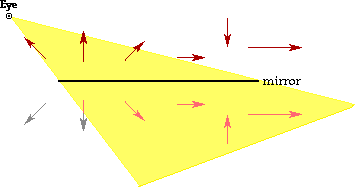
The images of the arrow objects can be found by using the principle that the image distance equals the object distance. The two extremities of the arrows can be used to find the two extremities of the image. The entire image will stretch from the image extremities.
The eye will be able to see any ray of light which bounces off the edges of the mirror or between the edges. The region shaded in yellow represents images within the visual field of this particular eye. When the yellow region is extended behind the mirror, it becomes obvious that the eye is unable to see the leftmost image and can see only a portion of the image located second from the left.
|
29. Locate all of the images formed by the mirror systems below.
|
Answer and Explanation:
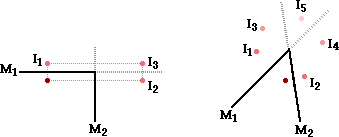
The images have been shown in pink above. The images and mirrors have been labeled to facilitate the discussion below.
For the right angle mirror, there are three images; two are primary images and the third is a secondary image. The primary images I1 and I2 are simple an image resulting from the reflection of light off of mirrors M1 and M2. When viewing these images, light from the object will reflect off one of these mirrors and travel towards the viewer's eye. The secondary image I3 is an image of an image. When viewing the secondary image, light must first reflect off one of the mirrors and then the second mirror before traveling towards the viewer's eye. Elaborate step-by-step directions for locating these images are found elsewhere; see the Physics Classroom tutorial page.
As the angle between mirrors is decreased as shown on the right, more images are formed. Two of these images are primary images - I1 and I2; the other images are images of images (I3 and I4) or images of images of images (I5). Image I1 is the image created by mirror M1 and image I2 is the image created by mirror M2. When viewing these images, light from the object will reflect off the respective mirror and travel towards the viewer's eye. I3 is the image of an image - the image of I2 as reflected across mirror M1. A quick measurement will reveal that the distance from I2 to mirror M1 is equal to the distance from image I3 to mirror M1. I4 is the image of an image - the image of I1 as reflected across mirror M2. A quick measurement will reveal that the distance from I1 to mirror M2 is equal to the distance from image I3 to mirror M2. When viewing the secondary images I3 and I4, light will reflect off both mirrors before traveling to the viewer's eye. Image I5 is the image of an image of an image. A quick measurement will review that the distance from I3 to mirror M2 is equal to the distance from I5 to mirror M2. Similarly, the distance from I4 to mirror M1 is equal to the distance from I5 to mirror M1. When viewing this image, light will reflect off one of the mirrors twice and the other mirror once before traveling to the viewer's eye.
|
[ #27 | #28 | #29 | #30 | #31 | #32 ]
|
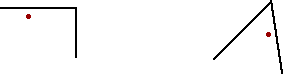
30. Consider the following object in front of a plane mirror. Construct a ray diagram to show how light travels from the object (arrow) to the mirror and ultimately to the eye; then indicate the portion of the mirror needed in order for the eye to view the image.
|
|
|
Answer and Explanation:
The image of the arrow object can be found by using the principle that the image distance equals the object distance. The two extremities of the arrow can be used to find the two extremities of the image. The entire image will stretch from the image extremities. This is shown in blue.
For the eye to see this image, it must sight along a line at the top of the image and the bottom of the image. As the eye sights along this line, a ray of light comes to the eye along this line of sight. This ray is the reflected ray. The light originates at the object and strikes the mirror at the location where the line of sight intersects the mirror. The light will automatically follow the law of reflection at the mirror (if the image is accurately located and the lines of sight are accurately drawn). The path of light is shown in red; note that dashed lines are used as extensions of the original line of sight extending behind the mirror.
|
[ #27 | #28 | #29 | #30 | #31 | #32 ]
31. For the right angle mirror below, draw in the secondary (or middle) image and show how light travels from the middle image to the eye.
|
Answer and Explanation:
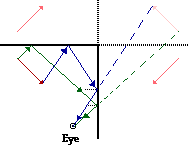
The primary and secondary images are drawn in a shade of pink. Once located, the ray diagram can be constructed. The principle that "to see an image, the eye must sight along a line at the image" is utilized. The set of green and blue lines represent the path of the light from the object to the eye. As the eye sights at the top of the middle image, light travels along the line of sight marked by the blue line and extended backwards to the top of the middle image. The light bouncing off the vertical mirror must first come from the horizontal mirror. The ray coming from the horizontal mirror to the vertical mirror is determined using the law of reflection. A normal line is drawn (in black) and the angle of reflection is measured; this angle is then used to determine the angle of incidence at the vertical mirror's surface. A ray is then traced backwards at this angle to the horizontal mirror. The light originated from the top of the object; thus, a ray is drawn from the top of the object to the horizontal mirror. These light rays for viewing the top of the image are drawn in blue in the diagram above. The process is repeated for viewing the bottom of the image; these rays are drawn in green.
Complete step-by-step instructions for right angle mirror ray diagrams are described elsewhere. See the Physics Classroom tutorial page.
|
[ #27 | #28 | #29 | #30 | #31 | #32 ]
32. Construct ray diagrams to show where the images of the following objects are located. Dray in the complete image and describe its characteristics (real or virtual, enlarged or reduced in size, inverted or upright). (NOTE: review the ray diagrams for all possible objects locations for each device.)
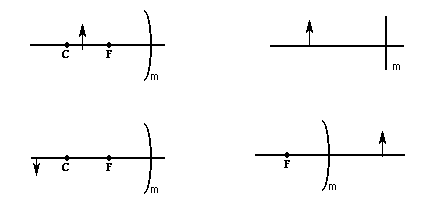
|
Answer:
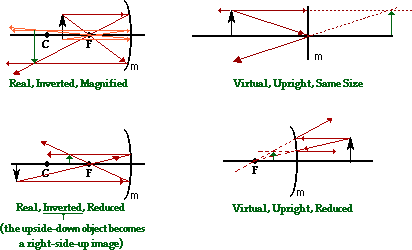
The images are drawn in green. The light rays are drawn in red or orange. The image descriptions are stated in green below each ray diagram. Elaborate step-by-step directions for constructing ray diagrams are provided on a separate page - see the links below. The plane mirror image is found by drawing any two (or more) rays and reflecting them according to the law of reflection. The reflected rays will always intersect at an image point.
|
[ #27 | #28 | #29 | #30 | #31 | #32 ]
Navigate to:
Review Session Home - Topic Listing
Reflection and Mirrors - Home || Printable Version || Questions with Links
Answers to Questions: All || #1-#19 || #20-#26 || #27-#32 || #33-#42
You Might Also Like ...
Users of The Review Session are often looking for learning resources that provide them with practice and review opportunities that include built-in feedback and instruction. If that is what you're looking for, then you might also like the following:
- The Calculator Pad
The Calculator Pad includes physics word problems organized by topic. Each problem is accompanied by a pop-up answer and an audio file that explains the details of how to approach and solve the problem. It's a perfect resource for those wishing to improve their problem-solving skills.
Visit: The Calculator Pad Home | Calculator Pad - Reflection and Mirrors
- Minds On Physics the App Series
Minds On Physics the App ("MOP the App") is a series of interactive questioning modules for the student that is serious about improving their conceptual understanding of physics. Each module of the series covers a different topic and is further broken down into sub-topics. A "MOP experience" will provide a learner with challenging questions, feedback, and question-specific help in the context of a game-like environment. It is available for phones, tablets, Chromebooks, and Macintosh computers. It's a perfect resource for those wishing to refine their conceptual reasoning abilities. Part 6 of the series includes topics in Reflection and Mirrors.
Visit: MOP the App Home || MOP the App - Part 6