Hold down the T key for 3 seconds to activate the audio accessibility mode, at which point you can click the K key to pause and resume audio. Useful for the Check Your Understanding and See Answers.
Thus far we have focused on the images formed by a single plane mirror. Occasionally, there are optical systems that consist of two or more mirrors. One such system that is often found in homes is a pair of plane mirrors adjoined at right angles to each other. Such a system is called a right angle mirror (pretty clever, huh?). Perhaps you have a right angle mirror set in one of your house's bathrooms.
If you have a chance to look carefully at the images formed by right angle mirrors, then you will notice that right angle mirrors produce three images. Interestingly, a single mirror produces a single image; another single mirror produces a second image; but when you put the two single mirrors together at right angles, there are three images. So why are there three images and how can the three images be compared and contrasted?
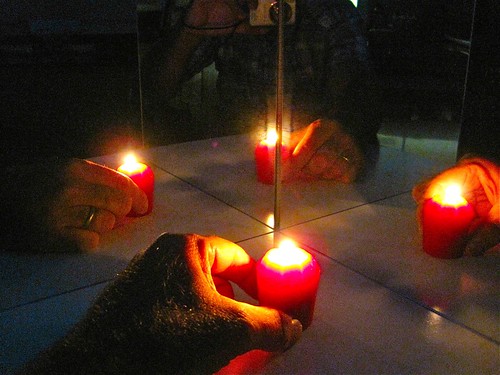
Flickr Physics Photo
A candle is placed in front of a right angle mirror. Three images are formed by the mirror.
Investigating the Three Images
The diagrams below depict the three images of a right angle mirror system. The location where a person must sight to view his image and the left-right orientation of the resulting image is shown. In each case, the object is raising his left hand.
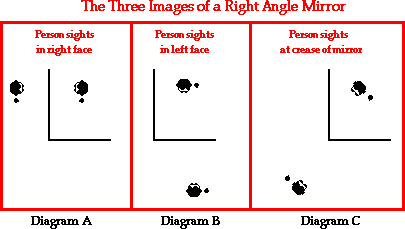
Diagram A and Diagram B show the appearance of your image when you sight in one of the single faces of the mirror. These two plane mirror images exhibit the left-right reversal that was discussed earlier in Lesson 2. While the object is raising her left hand, the image appears to be raising the right hand. This image characteristic is not unusual, for we have already discussed it in detail earlier in Lesson 2. These two images are sometimes referred to as primary images. When viewing a primary image, light is reflecting off a single mirror before arriving at your eye. Diagram C shows the appearance of the middle image, sometimes referred to as a secondary image. The secondary image does not exhibit left-right reversal; a careful inspection of Diagram C reveals that while the object is raising the left hand, the image is also raising the left hand. Why the difference? Why would the secondary image not produce the left-right reversal that we observe in most plane mirror images?
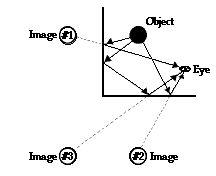
To answer these questions, we need to begin developing an understanding of the image locations for these three images and to generate the ray diagrams for these three images. It has already been pointed out that an image is the location in space where all the reflected light appears to diverge from. Everyone viewing the image would be sighting at the same location. Thus, if you were able to sight at the image from at least two different locations and extend the lines of sight behind the mirror, you would be able to determine the image location. This line of sight method is often used in Physics labs to determine the location of the three images. The diagram below shows the lines of sight that are required to view the three different images produced by a right angle mirror system. Lines of sight are drawn for two different eye locations. When these lines of sight are extended backwards, three intersection points are made - one for each image.
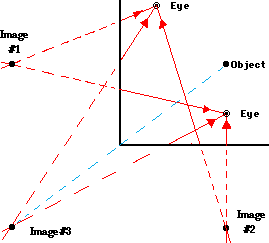
An inspection of the diagram shows that image #1 is located directly across the face of the mirror and the same distance behind the mirror as the object is in front of the mirror (nothing surprising yet). Image #2 is located directly across the other face of the mirror and the same distance behind the mirror as the object is in front of the mirror (still nothing surprising). Image #3 is located directly through the crease of the mirror and the same distance from the crease as the object is from the crease (now that might be surprising). In fact, a diagonal line drawn from the object location through the crease of the mirror will pass through the third image. So the image locations for the primary images are found in the usual way; but the image location for the secondary image must be found by measuring the object's distance to the crease of the mirror and then measuring along the diagonal line the same distance behind the mirror.
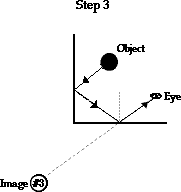
Ray Diagrams for the Secondary Image
Now that we know where the images are located, we are ready to draw ray diagrams for the three images. Ray diagrams for the primary images are constructed in the same manner as demonstrated earlier in Lesson 2. The secondary image is the only new twist to drawing ray diagrams for right angle mirror systems. The method begins in the usual way: once the secondary (or middle) image has been located, use the line of sight method to determine how light reflects off the second face of the mirror to the eye. Then the twist occurs: now use the law of reflection to determine how light reaches the second face of the mirror. That is, draw a normal line, measure the angle the reflected ray males with the normal and then draw the incident ray to the second surface. This incident ray will originate at the first face of the mirror; thus, the incident ray on the second face of the mirror is merely the reflected ray from the first face. Now that you have determined the point of incidence on the first face, draw the incident ray from the object to this point of incidence. These three steps are illustrated below.

 Left-Right Reversal - When NIKE Appears as EKIN
The ray diagrams for all three images of a right angle mirror are shown in the diagram at the right. Observe that the two primary images (images #1 and #2) are seen by the eye as the result of a single reflection of light off a single mirror. However, the secondary image (image #3) is seen by the eye as the result of a double reflection. That is, light must reflect off both mirror surfaces in order to view the secondary image. This helps to explain the observation that the primary images exhibits left-right reversal but the secondary image does not. When looking at your NIKE shirt in one of the mirror faces, the NIKE lettering appears as EKIN. Not only would the order of letters appear reversed, but also the letters themselves would appear reversed (which is not easily done when typing from a keyboard). However when looking at your NIKE shirt in the crease of the mirror, NIKE remains NIKE.
As discussed earlier in Lesson 2, the apparent left-right reversal of a plane mirror image is explained by the flipping of reference frames. Instead of viewing your shirt from behind the shirt, you are viewing your shirt from the perspective of a person standing in front of your shirt. It is as though your frame of reference has been rotated 180 degrees about the imaginary axis that extends from your head to your toes. This switching of reference frames leads to the appearance of left-right reversal. So a single reflection causes NIKE to reverse once, producing EKIN (but again, the letters themselves would be reversed). But in viewing the secondary image, you are viewing an image of an image - a double reflection. The double reflection of light (as is the case with the middle image) causes the letters of NIKE to reverse to EKIN and then to reverse again back to NIKE. The double reflection of light causes the reference frame to rotate a full 360 degrees. A 360-degree rotation about an axis is a complete rotation, returning you to your usual frame of reference.